Wednesday, March 6, 2013

Lenovo G555: Blank Screen On Boot

My uncle recently provided me with a Lenovo G555 that had what sounded like an overheating issue. Computer turned itself off, waited a few hours, and it would come back to life. We told him the basics about laptop care (don't leave laptop on soft surfaces, if necessary you can turn it upside down to allow airflow, that kind of thing.) When it got to us, it had been dead 3 days with no signs of coming back. For those of you who don't know how this ends, it isn't coming back. You would press the power button, and the fan would spin up, hard drive and cd/dvd drive would make noise, the power and charging light would even come on. But nothing (not even a lit black screen) would come up on the LCD, the HDD and Wifi light wouldn't light up, and the keyboard presses didn't seem to do anything at all.

To ensure it wasn't anything else, we:
-Pulled out the battery, ran it on AC power
-Plugged it into an external monitor
-Pulled out the hard-drive
-Put in a bootable DVD
-Pulled out the RAM and installed each on its own

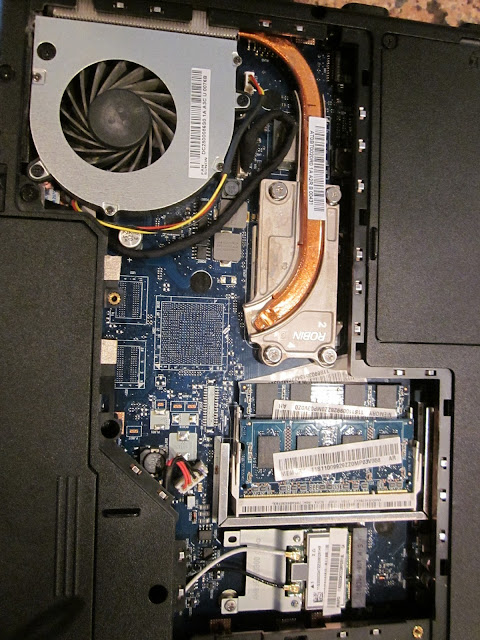
and finally examined the motherboard for any telling signs. And that there were.
Full motherboard shot


From first sight there wasn't anything wrong.
Then I noticed some red looking stuff on the chip on the upper left hand corner (I had cleaned it before I took these pictures)


As you can see here, post rubbing alcohol, pre-screwdriver, something seems to have shorted here beside this capacitor.
Blurry picture post-screwdriver.


Capacitor after scraping off gunk with Flathead screwdriver

 Even after the cleaning there was no joy with this laptop, but from what I do know, some capacitors have a
shelf life, and if one has gone, others may as well without the fun show we see here (as well as they may be on the opposite side of the board) This laptop is fully dead. And at that point there's only one thing you can do: Check his pockets for loose change.

UPDATE 9/9/13:
After some research I found that a common issue with this computer is overheating that leads to warping of the motherboard and therefore the disconnection of the graphics chip. How did I find this? Lots of this laptop on Ebay with the same problem attributed to said problem as well as repair videos teaching re-flowing on this laptop. Just saying.

UPDATE 1/8/14
After thinking this one through a little more, I have decided that this is most likely an issue of overheating. Although there is what looks like a dead capacitor (if you didn't see it before, it was the middle black and silver square just to the left of the "large" black chip in the last photo. With all of the overheating symptoms that this computer problem started with, it seems more likely that the graphics chip is having issues than that one capacitor on the board dying. That being the case, when I get a chance, I plan to get a large toaster oven and follow the directions here to see if I can't fix this one. If I do, successfully or not, I will post my findings here. For more information on reflowing and this type of issue, look up the similar issue of the Xbox 360 RRoD (red ring of death). Many people will recommend terrible fixes including overheating the machine on purpose (bad idea, most things on the board don't like controlled heat.) and putting it in your oven after stripping it down (also bad idea, solder fumes are toxic, and you will want to cook food in there!), but there are good solutions, such as using a heat controlled hot air gun, using an electric skillet (that you won't use for food ever) or the toaster oven idea. Keep in mind that this is technically very difficult process and these methods are only given because your machine is ALREADY dead. You have very little to lose -- if you mess up, it's still dead. You could have it done professionally, but that would likely cost more than a new laptop or Xbox.
Tuesday, February 12, 2013

Logitech Quickcam STX Linux Driver


For anyone like me who is searching for the linux drivers for this webcam, look no further. There were at least 2 depreciated projects I went through before I got here, but lo and behold, this camera is supported out of box. Granted, that doesn't mean that it works with skype (it has been giving me trouble in both Lubuntu 12.04 and Windows XP), but you should be able to open VLC (not cheese, at least for me) and have it open right up from File > Open Capture Device, and then choosing /dev/video0. Hope that helps out both you and me for a later date. If someone got it working in Skype, let me know!

Monday, December 17, 2012

How to PrintScreen in Ubuntu(or Lubuntu)

In windows, it seems like PrintScreen is a basic, alongside the existence of dirt, rocks, and trees. But in Ubuntu (as far as I have experienced) is not so easy.

As my own Google search failed me, I will state the obvious to everyone else who didn't know like me.   There are 4 basic ways to do this

A) Gnome Screenshot Utility
B) The PrintScreen button
C) The shell (or terminal)
D) The GIMP

Gnome Screenshot

This one is pretty basic -- open your "start menu", go to accessories, then click "Take ScreenShot". That's it. From there you can play with the options.

PrintScreen Shortcut

This one isn't so simple, mostly because the functionality seems to be different than what one would normally guess. This is the one I wanted to use, as it is simple and I don't use Gnome. 

What I found was that PrintScreen works as expected, except that instead of copying to the clipboard the screen capture is saved to a .png file in your home directory ( /home/(your username) ). If you press Alt-PrintScreen, it should just capture the selected window at the time to that same place.

Shell

There seem to be quite a few options for this kind of thing, but the first and easiest I found was ImageMagick. Lots of places will give you a command like 

sleep 10; import -window root screenshot.png; gimp screenshot.png;

when you ask how to do this from terminal, but what they don't tell you is that most people probably don't have imagemagick installed already. For that you would need to 

sudo apt-get install imagemagick

to install. From there you can use that command which will (in order on the command) wait 10 seconds, capture from the "root window"(which is the whole screen), saves to screenshot.png, then opens up in gimp

If you run that command and get the "Import: command not found" issue, then you need to install/re-install imagemagick.

The GIMP

EDIT: This way of doing it is a way I found out much later, but now it is the only way I use.
Simply open up the GIMP (or if you don't have it under Graphics > GIMP Image Editor , simply run "sudo apt-get install gimp")


After GIMP loads, click File > Create > Screenshot. I'm sure you can figure it out from there.


Wednesday, December 28, 2011

Mini: Virus Aftermath Clean-Up (File Type Associations)

For Win 7 computers I found another resource for fixing file type associations in case a virus breaks them. If you are having this problem, what happens is you click on a link, but instead of opening the program the "Open file-type with what program" box pops up. You can trick it into opening the program you want by choosing it from the menu, but it is far from optimal. Solution? Well one is this. There is a post on SevenForums.com(which I am not very familiar with) which gives you a page of registry file downloads that will repair your default file type associations for Windows 7. I just downloaded the .exe and .lnk files, added them, and voila! Like a charm. Hope that helps!

Thursday, November 17, 2011

Less on the Tech Side - Restoring a Whiteboard

While I did spend most of  my day attached to a computer or sitting in class, at the end I got a little surprise gift. I call it a surprise because it wasn't supposed to be a gift. What I received was a 2'x3' white-board with marker on it that wouldn't come off (except by scratching directly). Well, I know I'm not the first one to have this issue, so off to google I went. And I came up with this.
I had:
  • An Ehow article describing how to clean a white-board, 
  • a rag, 
  • bottle of alcohol, 
  • Kaboom
  • about 15 minutes
  • a bottle of Orange Glo
  • not a bottle of multi-surface pledge  and
  • not shaving cream
First off I tried the isopropyl and the rag, and most of the marker came off. Where different colors of marker were used, there were light smears of color creating a colored backdrop. Not what I was going for. Next I tried Kaboom! the bath/tub/tile cleaner on it. I simply sprayed it on and quickly cleaned it off. This removed even more, but yet still not all. Next up I tried shaving cream, since it is just soap, not realizing that the 2 products before it were significantly stronger than it. Nothing happened except making my hands smell like Colgate with Aloe. I figured that it wasn't getting any cleaner, so I moved on. I dried it off (which took a little bit more off) and moved on to the pledge. The article recommends pledge, and I didn't have any of the original, so I sprayed the multi-surface pledge on the board, let it set, and wiped it clean. Nothing came off, and the board had a dry feeling to it. Since I know that pledge is a wood cleaner with oils for the wood, and that my teachers called white-boards grease-boards (not sure if they were right to do so, but that is neither here nor there) I decided to try the Orange Glo, which is a fancier(in my opinion) wood cleaner. Mine was the 2 in 1 type in case you would like to replicate my findings. Anyhow, I sprayed it on liberally, let it sit a few minutes, and rubbed it in with a paper towel. As I rubbed it in, the board began to turn white and the last of the marker began to come off, although with some effort. I rubbed it dry, and gave it a test drive. Perfect -- no stray marks or splotches of color. #win

Day's Roundup: E17 Debian Squeeze Stable

Fought tooth and nail for the last few days to get Enlightenment 17 installed, and finally won. Here are a few solutions that I used and needed, but the most useful one is here.

Gist:
Ok, here are the steps I followed. If I missed any details, please let me know so I can update this. Oh, and for the sake of this example, we'll use Debian Squeeze.
1) Install e17
   a) Download easy_e17.sh from http://omicron.homeip.net/projects/#easy_e17.sh
b) Install all the required packages as root or sudo:
    apt-get install subversion autoconf automake1.9 autotools-dev autoconf-archive gettext libtool libfreetype6-dev libjpeg62-dev libpng12-dev libtiff4-dev libungif4-dev libbz2-dev libltdl3-dev pkg-config libxine-dev build-essential flex bison byacc libxcursor-dev libcurl4-gnutls-dev libtag1-dev sqlite libxml2-dev libsqlite3-dev libxslt1.1 libxslt1-dev giblib1 giblib-dev libtool libtagc0-dev libmpd1 libmpd-dev libxcomposite-dev libxcomposite1 libxdamage-dev libxdamage1 libxkbfile-dev libxkbfile1 libxkbfile-dev libxkbfile1 libdbus-1-dev libtheora-dev libpopt-dev libglib2.0-dev libfontconfig1-dev libxrandr-dev libasound2-dev libxinerama-dev cvs automake libgstreamer0.10-dev menu menu-xdg xdg-utils liblua5.1-0-dev dbus-x11 libiptcdata-dev libexif-dev libpam-dev mesa-common-dev libudev-dev x-window-system slim
c) As root or sudo, run: bash easy_e17.sh -i (to install e17)
d) Follow the instructions at the end of the script's output
e) Set the path (the following steps are as the regular user): export PATH=\"$install_path/bin:\$PATH\"
f) Create /home/me/.xsession with 'exec /opt/e17/bin/enlightenment_start' (w/o quotes)
g) Create the symbolic link: ln -s ~/.xsession ~/.xinitrc  To start e17, do: startx

 A few things to mention, my e17_src folder kept on popping up in the root directory, so I went to the script and replaced $HOME with /home. Worked like a charm. Additionally I had to reconfigure my DM to recognize Enlightenment, and install xcb and a few other files I think. Have fun!

How to configure SLiM for Linux
Gist:
To configure SLiM to load a particular environment, edit your ~/.xinitrc to load your desktop environment:
#!/bin/sh

#
# ~/.xinitrc
#
# Executed by startx (run your window manager from here)
#

exec [session-command]
SLiM reads the local ~/.xinitrc configuration and then launches the desktop according to what is in that file. If you do not have a ~/.xinitrc file, you can use the skeleton file by:
$ cp /etc/skel/.xinitrc ~
Remember to make .xinitrc executable:
 chmod +x ~/.xinitrc
Replace [session-command] with the appropriate session command. Some examples of different desktop start commands:
exec awesome
exec dwm
exec startfluxbox
exec fvwm2
exec gnome-session
exec openbox-session
exec startkde
exec startlxde
exec startxfce4
exec enlightenment_start
exec ck-launch-session $ONE_OF_THE_ABOVE
To get automount to work it might be necessary to use something like e.g.:
exec ck-launch-session dbus-launch startxfce4

How to fix “X: user not authorized to run the X server, aborting.”

Gist:

In linux, by default root user is allowed to run X server in most cases. So you don’t face this issue while running “startx” as root user.
Basically the Xorg X server needs to be configured to to authorize this user. Where should we configure this?
/etc/X11/Xwrapper.config – This file has as setting called “allowed_users”. It can accept three values:
1. root
2. anybody
3. console
The above values are self explanatory. You can edit this value to set as anybody for normal user to start X server. If normal user starts X server from console, console can also be set. It can be like this.
allowed_users=anybody
In Debian and its derivatives like Ubuntu, you can run the following command to do it in user friendly screen as shown below.
# dpkg-reconfigure x11-common

How do you modify a user's home directory in Unix/Linux?

Gist:

1. Login as a user with sudo privileges.
2. Enter this command:
sudo nano /etc/passwd
3. Nano text editor opens up. Locate the username you would like to change the home directory of (the last added user is in the end), and just enter whatever directory you would like. For example, the home directory for the user jack is set to /home/jack in this file:

Wednesday, November 16, 2011

QuickFix

Error: visudo: sudoers.tmp is unchanged

Fix: my VISUAL element was wrongly configured and contained an invalid argument. Simply did "export VISUAL="leafpad" " and all was well